I’m very excited to share our completed entryway (or foyer), staircase, and upper hall with you today! We began this renovation back in 2021 and it has been a long and laborious process. I believe it’s the largest project we’ve tackled, in terms of square footage… and certainly the one with the most millwork. I’m absolutely thrilled with how things came together and I definitely feel it was worth the wait. I hope this is further proof the best spaces deserve time and attention to detail. Click through for the completed space, sources, and some really good before & after images. Enjoy the reveal tour and a closer look into our home!

If you’re curious how this space evolved or are interested in seeing more of the process, be sure to check out the below posts for a deep dive into the renovation… these are in chronological order.
Before Images

I think it’s important to give you an accurate, in-depth glimpse of where we started with these spaces. Upon moving in, our 1990’s home lacked character (to say the least). The house was a sea of gray paint, gray carpet, outdated cherry wood, and matte black lighting- the previous owners even spray painted the brass chandelier matte black. Scroll through some of these…
The first time we toured this house with our real estate agent, we walked through the front door and I quickly wrote this place off before the tour even started. This room was the first impression and it was an immediate no from me. Even as a designer, I felt intimidated and overwhelmed by this space. There was a LOT that needed to be addressed and I didn’t feel confident we were cut out for it.
Despite my sense of overwhelm and negativity (which is honestly unlike me), Emmett convinced me to finish the tour, see the home for a second time, and the rest is history. He promised me he would make my millwork dreams come true and we’d dream up something beautiful together… and he delivered (as you’ll soon see). I’m glad he talked me into this house, but this room almost sent me running toward another place to call home.
Entry & Foyer

The first item we tackled was replacing the front door, which actually occurred back in 2019- a couple years before we even started renovating this space. In keeping cohesive with our high contrast black front doors, I carried that neutral color palette into the entry.
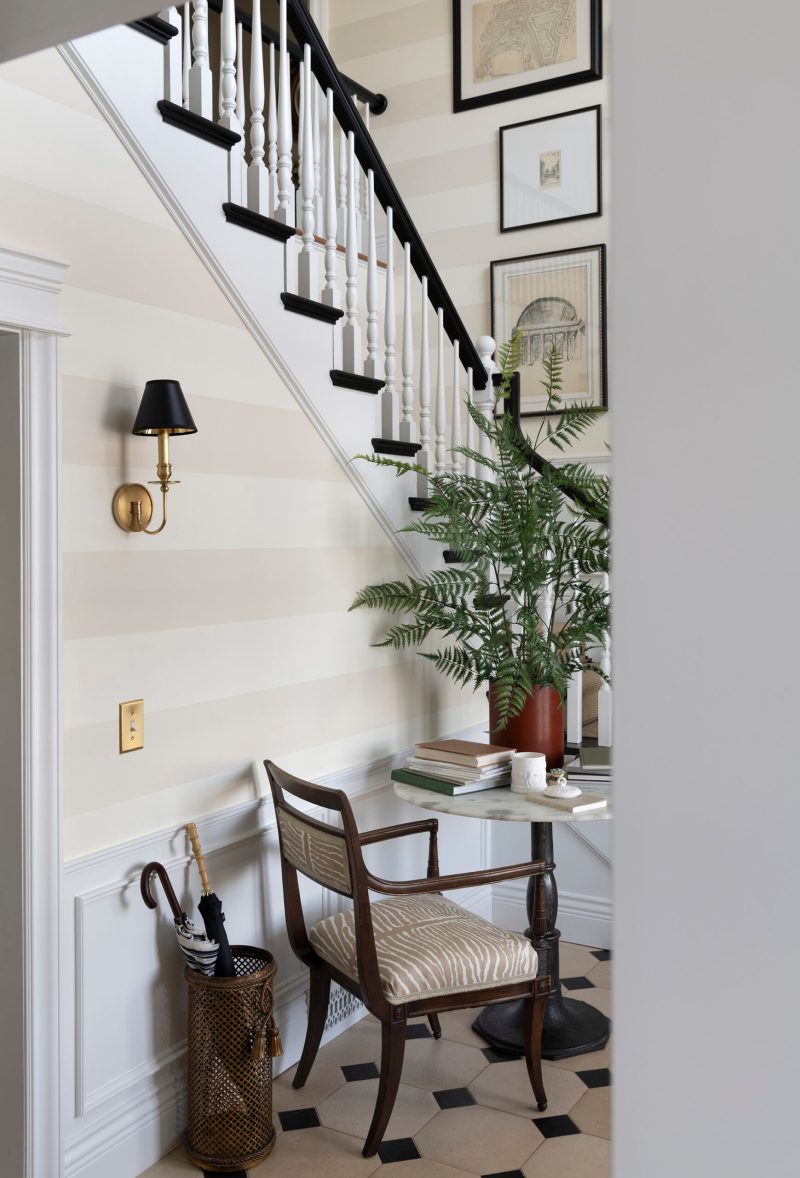
We replaced the original oak flooring with beautiful French limestone cabochon tile (more on our entryway tile here), and installed additional light sources for better functionality.

I wanted to install a large gallery wall, intentionally leading your eye up the staircase. Between vintage works I had collected over the years alongside new pieces from my shop, Tuesday Made, I leaned into architectural studies. Check out this post on how to easily layout and install a gallery wall, if you’d like a peek behind-the-scenes and a closer look at the making of this curated gallery.

In regard to furniture, I knew we need a couple chairs or places to take a seat in the foyer, and a table also fit nicely into our floor plan. I scored a stunning pair of really old chairs last summer, which I updated with this space in mind. Remember this post on how to reupholster antique chairs? Same chairs!

I even found a place for our DIY wood pedestal in the floor plan, alongside a vintage ottoman… which makes the perfect spot for kicking off shoes or lacing them up.

My vintage taxidermy found a permanent place above my home office pocket doors, which feels like the perfect place to make a striking statement against a wall of stripes. Before you come at me for the gemsbok or oryx, please give this design discussion on taxidermy a read (thank you)!
I kept the foyer styling fairly simple and casual, but you know it’s ever-changing in my house. It kind of became an extension of my home office, as design books & magazines have spilled into the entry vignettes.

I really enjoy having a home office that is situated off the entry… it’s flooded with natural light, it’s accessible, and quiet- but the sliding doors have been imperative for sound proofing. They’re heavy and do an amazing job at providing privacy (and blocking out dog barks). I love this view from the top of the staircase.
Cash was not pleased I moved “his” animal print ottoman into the foyer, but it was never intended for my office. It probably comes as no surprise to hear I moved the skirted ottoman that nests under my desk in front of the window for him. He runs this place! It’s a much better fit and I appreciate the warmth this one brings to the entry.
Staircase

Let’s move along to the staircase… which took a ton of time to design, build, and finish. I wanted to completely rework the stairs and millwork, pursuing an aesthetic that felt timeless. Everything is new- balusters, newels, the hand rail, risers, the treads, and we even added a stringer. If you’re also facing a staircase dilemma, this post contains the stair parts and vocabulary to know. It was a ton of work, but the end result was worth our time, energy, and money. We also decided to install a woven stair runner after rebuilding, which adds the perfect amount of traction, warmth, and functionality to our staircase.
In addition to replacing the stairs, we also swapped seven doors lining the upper hall. Four of which lead to bedrooms, one to the guest bathroom, and two are closet doors.

Replacing that many doors was no easy feat, but it made a huge difference. If you’re considering replacing doors and hardware in your home, be sure to save these two helpful posts for reference:

In an effort to make the foyer and upstairs hall feel connected, I continued the gallery wall to the vaulted ceiling. It also helped make this gigantic, open space feel more intimate and cozy. Can you tell which works of art are vintage and which are new?
Upper Hall

I kept the upper hall very simple. Alongside the updated doors, we added wainscoting, sconces, a couple soft runners, and I styled an antique demilune table beneath a round gilded mirror. That vignette provided warmth and a nice focal point.
As we updated the lighting and electrical, our switches got a small, yet effective upgrade. Making outlets & light switch plates look better is an easy and affordable endeavor. Those little details matter!

We continued the striped paint in the main area of the foyer, but kept the back hallway solid- using the darker paint color for cohesion. The warm creamy hues change throughout the day with the light and are so pretty in person. If you missed this post, it’s worth a read… 24 of my favorite neutral (non-white) paint colors. Save those swatches!
I’m infatuated with the Windsor chandelier we installed. It’s subtle, monochromatic & warm, and it doesn’t obstruct our stunning view of the mountain range from atop the stairs. It feels like it was made for this space, offering the perfect plaster texture with parchment shades. Those whimsical curves and swooping arms perfectly juxtapose the hard edges of the striped walls.

Get the Look: Sources
Click on each item within the collage to be directed to the source.
If there is anything I’m missing, feel free to ask! I’m always happy to share sources. If you’re curious about a specific work of art, they’re all available in my shop- just send us a message over at Tuesday Made. Even if it’s not currently listed, we can order it for you.

FAQ
It’s vintage! I was able to find some exact (vintage) options… I linked them here for you. Isn’t the tassel detail so beautiful?
Emmett made the air returns… they turned out so beautiful- much better than the average metal plate. I faux painted the floor vent cover to seamlessly blend with the limestone floor tile.

More Room Reveals
Want to tour more of my home? I’ll link some of my favorite room reveals for you below. It’s always rewarding to look back at past projects that have made our house a home over the years…
Of course having lived here six years now, these spaces have all changed a bit… you can find sources and take the current tour, here!

You know I’m looking forward to your thoughts. Feel free to share in the comment section below. I hope you enjoyed the tour! I really appreciate you following along with this very long renovation- I know it seemed to drag along. While it spanned almost four years, that’s home renovating reality. Good things take time, money, and a lot of effort & elbow grease… especially if you’re doing it yourself. While we did hire out the painting this time, I’m proud to say Emmett & I built this space together. My goal was to finish this room before the end of 2024, and styling the entryway for the holidays was the icing on the cake. We did it and I feel so lucky to live in this beautiful home we’re slowly making our own! It sure has come a long way.


